How to Inspect Keyboard Shortcuts: A Practical Guide
Learn a practical, step-by-step method to inspect and validate keyboard shortcuts across apps, ensuring reliability and consistency.

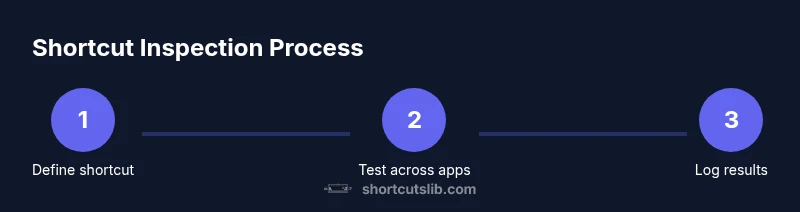
By the end, you will know how to inspect any keyboard shortcut for reliability: verify the exact keystroke triggers, test across apps, check for conflicts, and document outcomes. You’ll need a working computer, a few test applications, and a simple logging workflow. According to Shortcuts Lib, systematic inspection reduces errors and improves workflow confidence.
What is inspected when you learn how to inspect keyboard shortcut
The phrase how to inspect keyboard shortcut might sound simple, but the practice touches several layers of reliability. At its core, you’re verifying that a defined keystroke reliably triggers the exact action you expect, under typical conditions, across different software environments. It also means checking for edge cases: does the shortcut still fire when other windows are active, or when accessibility features are enabled? In this guide, we treat the inspection as a repeatable process you can apply to any shortcut, whether you’re a developer, designer, or power user. As you begin, remember that consistent results hinge on a precise definition of the shortcut (which keys, in which order), the target action, and the conditions under which the shortcut should work.
To keep this process efficient, create a short checklist that you’ll reuse for each shortcut you inspect. This is where the core concept of how to inspect keyboard shortcut becomes practical: define, test, log, and review. Shortcuts Lib emphasizes repeatability and documentation, which turns a one-off test into a dependable standard you can share with teammates and replicate in future projects.
Throughout, focus on clarity: the more explicit your definitions and results, the easier it is to identify where things diverge. This section sets up the practical technique you’ll apply in steps later, and it frames the expectations for outcomes like timing, conflicts, and cross-application behavior.
Why a rigorous inspection matters for keyboard shortcuts
A rigorous inspection of keyboard shortcuts helps avoid surprises when people collaborate or switch tools. If a shortcut is poorly defined or inconsistently implemented, it can create confusion, slow down workflows, or even trigger unintended actions. The benefit of a disciplined inspection is twofold: it surfaces conflicts before users encounter them, and it establishes a documented baseline that teams can reference when onboarding or auditing software setups. Shortcuts Lib’s analysis shows that teams who document shortcut behavior experience smoother training and fewer bug reports related to input methods. When you inspect keyboard shortcuts, you’re not just testing a single keystroke; you’re validating a dependable input contract between the user, the software, and the operating system.
As you proceed, keep a running list of observations. If you discover that two shortcuts collide, note not just the conflict but the context in which it occurs, such as active application state, window focus, or accessibility features. That context becomes valuable data for future improvements. The goal is not perfection at first test, but robust, repeatable results that can be reproduced by others. Across platforms, the principle remains the same: clearly defined inputs, predictable outcomes, and transparent reporting.
In practice, this means you’ll test multiple dimensions: keystroke accuracy, action mapping, timing, state dependencies, and cross-application consistency. By documenting every variable, you minimize guesswork and create a reference you can revisit when updates roll out or new shortcuts are introduced. The end result is a reliable, auditable process you can share with stakeholders.
Preparing your testing environment for how to inspect keyboard shortcuts
A solid testing environment is the backbone of any reliable shortcut inspection. Start by standardizing the OS and applications you’ll use: ensure you have at least two apps that leverage shortcuts, a clean user profile, and consistent window focus rules. Normalize input methods (keyboard layout, language, and regional settings) and disable any non-essential accessibility features that could modify how keystrokes are perceived. This consistency helps you separate real shortcut behavior from environmental noise. When you establish a baseline setup, document the exact versions of your OS, applications, and any extensions or plugins that might intercept keystrokes.
Next, prepare a simple logging workflow. A basic text editor or note-taking app is enough to capture the observed outcomes, sure-to-be-accurate timestamps, and any deviations from the expected action. If you can, introduce a lightweight automation script or macro tool to trigger the shortcut and record the resulting UI state. Shortcuts Lib emphasizes reproducibility, so keep your environment as close to a “production” setup as possible while testing, and avoid random changes mid-inspection. A consistent baseline makes it much easier to identify when something truly deviates from the expected behavior.
Defining the target shortcut and expected behavior
The core of how to inspect keyboard shortcut begins with a precise definition. Start with the exact key combination, including modifier keys (Ctrl, Alt, Shift, Cmd) and the order of keys if your platform requires it. Document what should happen when the shortcut is pressed: the action, any UI changes (such as a dialog opening, a menu appearing, or a form field gaining focus), and the expected side effects (like a keystroke being captured or a particular application window receiving focus).
If the shortcut depends on context (for example, a browser shortcut that only works when a particular tab is active), write down the context rules clearly. This saves you from unconsciously testing scenarios where the shortcut would be ineffective. You can also create a matrix that lists platform differences (Windows vs macOS vs Linux), app-specific behavior, and any exceptions. The more explicit your target definition, the less room there is for ambiguity when you evaluate results later.
Finally, establish how you’ll record success: define the criteria for a successful trigger (e.g., “the target action occurs within 1 second, window title changes to X, a specific UI element becomes visible”). This crisp criteria helps you avoid subjective judgments during testing and makes the results actionable for future improvements. By the end of this step, you should have a crystal-clear map of input → expected output for your shortcut inspection workflow.
Step-by-step testing: triggering the shortcut and observing results
This section covers practical, repeatable actions you can perform to test a keyboard shortcut reliably. Begin by focusing the appropriate application and confirming the active window state. Press the exact key combination you defined in the previous step. Observe the immediate result: does the expected UI element appear, does the action execute, or does nothing happen? If the result is not as expected, pause briefly to confirm the keystroke was registered (check the keyboard LED states or a keypress logger if you have one).
Record the outcome in your log, including a timestamp, the exact keystroke, the active application, and any observable UI changes. If the behavior differs across apps, note the discrepancy and add potential causes (such as conflicting global shortcuts or specialized input methods). If the shortcut triggers the wrong action, stop and re-check your mapping and context rules. This step is repeated for each tested scenario, including variations like reduced idle time, active text fields, and different focus states to confirm consistency across conditions.
Pro tip: Use a timer to measure latency from keystroke to observed result. Even a small delay can indicate background processing or competing shortcuts. Shortcuts Lib recommends creating a standardized observation template to ensure you capture every relevant detail consistently across tests.
Verifying timing, focus, and application scope
Timing is a subtle but important factor in shortcut reliability. A shortcut should fire promptly, ideally within a predefined latency threshold. If a delay appears, log the exact duration and investigate potential bottlenecks such as CPU load, background processes, or conflicting hotkeys. Also verify that the shortcut behaves the same when the application is in the foreground, background, or when other windows are open. A shortcut that only works in a maximized window or only in specific UI states reduces overall reliability and user satisfaction.
Focus behavior is another critical dimension. A shortcut might work perfectly in a document editor but fail in a browser or email client due to different focus handling. Use focus tests to confirm that the active element receives the keystroke and that the intended component (e.g., a text field or button) responds as expected. If a shortcut triggers a system-level action on one OS but not on another, separate the platform-specific rules and document them clearly. The end goal is a predictable, well-scoped behavior that users can rely on, regardless of which app they’re using.
Finally, map the scope of the shortcut: is it global (works anywhere), application-bound (works only within one app), or window-bound (works only when a specific window is focused)? Clear scoping reduces confusion and helps you manage conflicts with other shortcuts more effectively.
Cross-application and cross-platform consistency checks
To maximize reliability, you must verify consistency across applications and platforms. Start by replicating the same shortcut in multiple apps that are part of a typical workflow (for example, a text editor, a browser, and an office suite). Observe whether the shortcut triggers the same action, or if there are app-specific differences. Note any deviations and identify whether they stem from the app’s internal keyboard handling, OS-level mapping, or accessibility overlays.
Now test across platforms. If your team uses Windows and macOS, ensure the shortcut either maps identically or has a documented platform-specific variant. Document any platform-specific conflicts and propose a solution, such as a single global shortcut with conditional behavior or separate platform shortcuts that align with user expectations. Cross-platform consistency is a core value in clean shortcut design, minimizing confusion when users switch devices.
To keep this test rigorous, reuse the same test plan across apps and platforms. The repeatable approach ensures you can detect changes over time—such as after a software update or a new plugin—before users notice. Shortcuts Lib highlights the value of a documented, reproducible approach to cross-application and cross-platform checks, which ultimately leads to a more reliable and user-friendly shortcut ecosystem.
Documentation and evidence: turning tests into a reference
Documentation bridges testing and real-world use. Create a concise, structured report for each shortcut you inspect, including:
- The exact keystroke and any platform-specific variants
- The target action and any UI changes
- Context rules and environment details (OS version, app versions, language settings)
- Timing data and latency observations
- Conflicts found and resolution proposals
- Screenshots or short video clips of key moments
Format your documentation so it’s easy to skim: use bullet points for criteria, a table for timing data, and a short narrative for unusual cases. A good reference should be reusable in future audits and onboarding. Shortcuts Lib recommends exporting these findings periodically, especially after software upgrades or significant configuration changes, so your shortcut ecosystem remains documented and up-to-date.
Common pitfalls and how to avoid them in keyboard shortcut inspection
No testing plan is perfect from the start. Common pitfalls include assuming that a shortcut is global without verifying its scope, relying on a single app’s behavior as representative, and ignoring edge cases like modal dialogs or accessibility features. To avoid these issues, always test a shortcut under multiple scenarios: with and without focus, in different app states (editing, reading, and idle), and with accessibility features enabled or disabled. Additionally, do not skip platform-specific differences; a shortcut that works on macOS might require a different mapping on Windows. Finally, avoid vague conclusions like “it works here,” and instead record precise outcomes and context. The use of a documented testing matrix helps you avoid these errors and keeps your findings actionable for future updates.
Advanced techniques: automation, scripting, and future-proofing your inspection workflow
As you become more proficient, you can add automation to the inspection process. Simple scripts can trigger shortcuts, capture UI states, and log results automatically. Consider using a small script that runs a test suite across apps and OS configurations, creating a CSV log that you can analyze later for trends. You can also build a lightweight dashboard that visualizes latency, success rates, and conflict frequencies over time. While automation adds complexity, it significantly improves consistency and scales your inspection process beyond manual testing. Shortcuts Lib advocates starting with small, repeatable automation chunks and expanding gradually as you validate reliability and maintainability.
Tools & Materials
- Computer with Windows/macOS/Linux(Ensure OS is up to date and standard input methods are configured)
- Standard keyboard (wired or wireless)(Full-size preferred; ensure modifier keys are labeled clearly)
- Two test applications (e.g., text editor and browser)(Each app should have identifiable shortcuts to inspect)
- Clipboard/logging tool or simple notepad(Record observed outcomes and timestamps)
- Screen capture tool(Capture evidence of results and UI changes)
- Timer or stopwatch(Measure latency between keystroke and result)
Steps
Estimated time: 25-45 minutes
- 1
Define the shortcut and expected action
Clearly specify the exact key combination and the action it should trigger. Include platform-specific variants if applicable. This definition becomes your testing contract and guides all subsequent steps.
Tip: Use a concise notation like Ctrl+Shift+K and document the OS context. - 2
Prepare the testing environment
Set up a clean workspace with two apps and a stable focus rule. Note OS version, app versions, and language settings to avoid environmental noise.
Tip: Avoid enabling features that alter input handling during tests. - 3
Create a testing log template
Make a simple template to capture keystroke, active app, window state, observed result, latency, and date. A consistent log format makes analysis easier.
Tip: Include a timestamp field and a short success/failure note. - 4
Trigger the shortcut and record outcome
In the target app, press the exact key combination and observe the result. If nothing happens, verify the keys registered and retry.
Tip: If the result is ambiguous, capture a screenshot and note the context. - 5
Test across scenarios
Repeat tests with different focus states, dialogs open, and when accessibility features are enabled or disabled. Gather data on consistency.
Tip: Keep each scenario separate in the log for clarity. - 6
Check for conflicts
Search for global or overlapping shortcuts in installed apps or OS settings. If a conflict exists, note it and propose a resolution.
Tip: Document potential safe alternatives if conflicts are unavoidable. - 7
Document results and conclusions
Summarize findings, include timing metrics, context, and any anomalies. Provide concrete recommendations for changes or clarifications.
Tip: Turn observations into actionable documentation for teammates. - 8
Review and plan follow-up
Share results with stakeholders, update documentation, and schedule a follow-up test after software updates or configuration changes.
Tip: Establish a cadence for re-testing shortcuts after major releases.
Questions & Answers
What is the first step in inspecting a keyboard shortcut?
Define the exact keystroke and the expected action. Clarify platform-specific variants and context rules before testing.
First, define the keystroke and the expected result, including any platform-specific details.
How do I handle conflicts between shortcuts?
Identify conflicts by searching OS and app shortcut settings. Document conflicting shortcuts and propose safe alternatives or scope changes.
Look for overlapping shortcuts, document them, and suggest alternatives or scope tweaks.
Can shortcuts behave differently across apps?
Yes. App-level handling can vary; test each target app and note any deviations with context.
Yes, app-specific differences can occur; test each app and log the results.
What tools help in inspecting keyboard shortcuts?
A simple log template, a timer for latency, and screen capture are usually sufficient to start. Consider automation later.
A log template, a timer, and screen captures help you start inspecting shortcuts effectively.
How often should I re-check shortcuts after updates?
Re-test after major OS or app updates, and whenever configuration changes that could impact shortcut behavior occur.
Test shortcuts after big updates or config changes to ensure they still work as intended.
Watch Video
Main Points
- Document each shortcut with exact keys and expected actions.
- Test across apps and platforms for consistency.
- Record timing and context to identify latency or conflicts.
- Create a reusable testing template for future shortcuts.