Screen Shot Keyboard Shortcuts: Master Quick Screenshots Across OS
Master screen shot keyboard shortcuts for Windows, macOS, and Linux. Learn full-screen, window, and region captures, saving formats, and basic annotations with tips from Shortcuts Lib.

You’ll learn practical screen shot keyboard shortcuts that work across Windows, macOS, and Linux. This quick guide covers full-screen, window, and region captures, saving options, and basic annotations, so you can snap, share, and document visuals without leaving the keyboard. Expect actionable, OS-agnostic patterns you can apply immediately.
What is a screen shot keyboard and why it matters
A screen shot keyboard refers to a curated set of keyboard shortcuts that capture the current display, an active window, or a user-selected region. These shortcuts speed up workflows by eliminating mouse navigation and reducing the chance of missing important content. For daily tasks like bug reporting, documentation, or sharing visuals with teammates, a reliable screen shot keyboard becomes a productivity multiplier. In this guide, we explore cross‑platform patterns, practical usage, and how to customize shortcuts to fit your routine. The core goal is simple: capture exactly what you need quickly and with minimal friction, whether you’re on Windows, macOS, or Linux. By mastering these keystrokes, you’ll save minutes per day and reduce repetitive strain.
Quick mental map of capture modes
Think in terms of three core capture modes: full screen, active window, and region/selection. Each mode serves different documentation scenarios. Full-screen grabs are ideal for state snapshots (e.g., a bug report or a system status page). Active-window captures focus on the task you’re finishing. Region captures are perfect for isolating a specific UI element. Knowing when to use each mode helps you produce concise, submission-ready visuals with minimal follow-up edits.
Cross‑platform consistency matters
The screen shot keyboard concept thrives when you apply a consistent mental model across platforms. For instance, many systems use a dominant key (PrtSc, Print Screen, or the equivalent) combined with modifiers like Shift, Alt, or Windows/Command keys. Even when the exact keys differ, the pattern remains: identify the capture type, trigger the shortcut, and decide how to save or share. This consistency reduces cognitive load and speeds up your documentation workflow.
Saving formats, destinations, and quick edits
After capturing, you’ll typically save as PNG or JPG. Some tools offer GIF or PDF export for reports. Promptly decide where the file goes: a default screenshots folder, a clipboard, or a note-taking app. Quick edits—like annotating, cropping, or blurring—can be done in platform-native tools or lightweight third‑party apps. The most efficient setups automate naming conventions and automate placement into your project folders.
Annotation and collaboration basics
Annotations add context to screenshots: arrows highlight issues, text boxes describe steps, and blur masks protect sensitive data. The quickest path is to use built‑in editors or a trusted annotation app that integrates with your workflow. When collaborating, consider including a concise title, date, and short summary of changes. These small details drastically improve clarity and reduce back-and-forth.
Practical practice makes progress
Create a short practice routine: capture a full screen, capture a window, capture a region, save to PNG, annotate a sample screenshot, and export a version for sharing. Repeating this in different apps (a browser, a code editor, a document) builds familiarity and confidence. Over time, these keyboard shortcuts become muscle memory, freeing mental bandwidth for the task at hand.
Accessibility considerations
Keyboard shortcuts should remain accessible. If a key combination is hard to reach, consider remapping or using accessibility features (sticky keys, alternative layouts). Ensure color contrast is preserved in annotations and that captions suffice for quick understanding when others view the screenshot. Accessibility-minded workflows broaden the usefulness of your screen shot keyboard.
Troubleshooting basics
If a shortcut isn’t working, verify your OS version supports the feature, check for conflicting apps, and try a system‑wide shortcut tester. On Windows, ensure the Windows key isn’t redefined by another program. On macOS, confirm that shortcuts for screenshots aren’t disabled in System Preferences. Small conflicts can stop captures, but a quick rebind often resolves the problem.
Building a personal shortcut map
Document your preferred capture modes and save destinations in a simple map: which keys capture what, where files go, and which annotation steps you use most. Review and refine monthly to keep your workflow efficient. A personal map makes it easier to teach teammates and maintain consistent documentation practices.
Tools & Materials
- Windows PC / Laptop(Use Win+Shift+S or PrtSc for region/full-screen captures)
- Mac computer(Use Command-Shift-3/4/5 for screenshots and screen recording)
- Keyboard with Print Screen key(If missing, enable on-screen keyboard or use OS shortcuts)
- Clipboard manager (optional)(Useful for chaining captures and quick pastes)
- Annotation/editing app (optional)(Helpful for marking up screenshots before sharing)
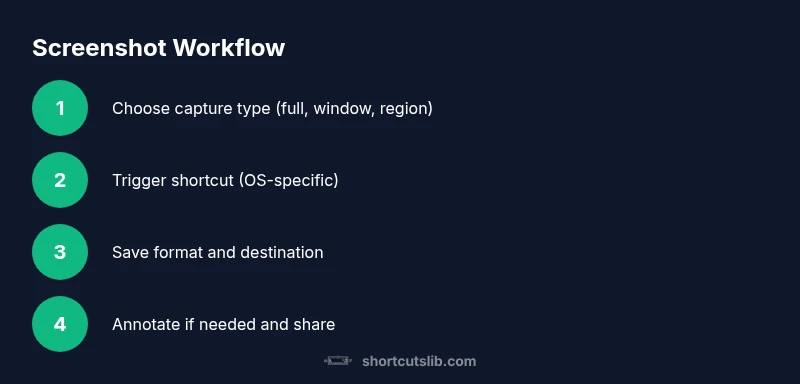
Steps
Estimated time: 15-25 minutes
- 1
Choose capture type
Decide whether you need a full-screen, active window, or region capture. This choice saves editing time and ensures the recipient sees exactly what matters.
Tip: If unsure, start with region capture to isolate the element of interest. - 2
Trigger the Windows capture
On Windows, press Win+Shift+S to open the Snip & Sketch tool and select your region. The image sits on the clipboard for immediate pasting.
Tip: Have Snip & Sketch pinned for quick access or assign a dedicated hotkey if your setup supports it. - 3
Trigger the macOS capture
On macOS, use Command-Shift-4 for region or Command-Shift-5 for more options including full screen and quick recording. The result saves to the desktop by default.
Tip: Use Control to copy directly to the clipboard instead of saving. - 4
Trigger the Linux capture
On many Linux desktops, press Print Screen to capture the entire screen, Alt+Print Screen for the active window, or Shift+Print Screen for a region. Behavior depends on the desktop environment.
Tip: If your distro lacks a hotkey, install a screenshot utility like Flameshot or Shutter for consistent shortcuts. - 5
Choose saving format and destination
Decide on PNG for lossless, JPG for smaller size, or PDF for documentation bundles. Save to a project folder or copy to clipboard for immediate sharing.
Tip: Set up a default screenshots folder to minimize path errors. - 6
Annotate and refine
Open the screenshot in your preferred editor to annotate, blur sensitive data, or crop extra context. Keep edits minimal to preserve clarity.
Tip: Define a consistent annotation style (colors, fonts) to speed up review. - 7
Create a quick sharing workflow
Add a note or tag to the filename, or upload directly to your task board or bug tracker. Automation saves time when dealing with repetitive tasks.
Tip: Leverage clipboard history features to paste the latest screenshot in your report draft.
Questions & Answers
What is a screen shot keyboard and why should I learn it?
A screen shot keyboard is a set of keyboard shortcuts that captures the screen, a window, or a region. Learning them saves time, reduces repetitive actions, and improves consistency when you document issues or share visuals.
A screen shot keyboard is a set of keyboard shortcuts that captures your screen. It saves time and helps you document issues quickly.
Which shortcuts work on Windows, macOS, and Linux?
Windows uses PrtScn and Win+Shift+S for region captures. macOS uses Command-Shift-3/4/5. Linux depends on the desktop environment but typically uses Print Screen or region tools.
Windows, macOS, and Linux each have a set of screen shot shortcuts that differ by OS, but the concepts are similar.
How do I annotate a screenshot quickly?
After capturing, open the image in a built‑in editor or a lightweight app to add arrows, text, or blur; save or export the annotated image for sharing.
Annotate your screenshot in the editor after you capture it, then save or share.
What formats should I save screenshots in?
PNG is ideal for sharp, lossless images; JPEG for smaller file sizes; PDF is useful for documentation bundles. Choose based on your sharing method.
PNG for clarity, JPEG for size, or PDF for reports.
How can I speed up my workflow with shortcuts?
Create a personal shortcut map and configure a default save location. Use clipboard managers for multiple captures and automate routine sharing tasks.
Map your shortcuts, pick a default save path, and consider a clipboard tool.
Watch Video
Main Points
- Master the three capture modes (full, window, region).
- Use OS-native shortcuts first, then expand with tools for editing.
- Standardize saving formats and destinations to boost efficiency.
- Annotate thoughtfully to add clarity without clutter.
- Create a personal shortcut map to sustain long-term productivity.