Keyboard Shortcuts for Bullet Points: Word & Editors
Learn practical keyboard shortcuts to create, format, and manage bullet points across Word, Google Docs, and Markdown. Speed up drafting while keeping documents clean and consistent with expert guidance from Shortcuts Lib.

Master the keyboard shortcut for bullet point word across Word, Google Docs, and Markdown editors. This quick guide shows how to create, indent, and customize bullets using keyboard shortcuts, saving time and keeping documents consistent. The Shortcuts Lib team found that proficient bullet shortcuts boost drafting speed and clarity.
Why keyboard shortcuts for bullet points matter
Efficient text drafting hinges on flow and consistency. Bullet points are a staple for outlines, checklists, and feature lists. Using keyboard shortcuts to create and format bullets reduces hand movement, keeps focus on ideas, and minimizes formatting errors that disrupt readability. The Shortcuts Lib team found that writers who rely on consistent bullet shortcuts report fewer interruptions and more coherent document structure. When you can start a bullet with a single keystroke, you stay in the flow and avoid clipping your train of thought. This matters across Word, Google Docs, LibreOffice Writer, and Markdown editors: each platform supports a fast path to bullets, even if the exact keystroke differs. In this guide, we'll cover cross-editor basics, practical examples, and best practices so you can apply a standard set of shortcuts in any writing task. You’ll also learn how to indent, nest, and convert bullets without losing content.
Editor-agnostic basics: the core actions that work in most editors
Bullet lists hinge on a few universal actions: create the list, add items, continue the list with Enter, and adjust levels with indenters. Across popular editors you’ll encounter a shared rhythm: start a bullet using the editor’s bullet command or toolbar, press Enter to add items, and use Tab to indent or Shift+Tab to outdent. The logic remains the same even when the exact keyboard combination changes by platform. This section focuses on principles rather than memorizing editor-specific hotkeys, so you can adapt quickly when you switch between Word, Docs, or a Markdown editor. Remember to maintain parallel structure and avoid mixing bullet styles in a single list.
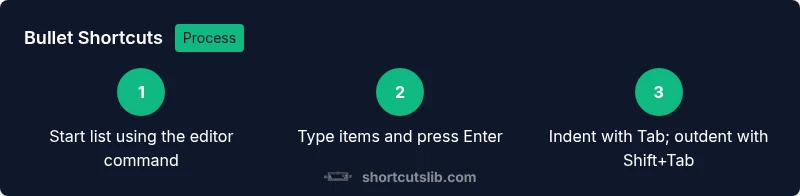
Creating bullet lists in Word, Google Docs, and Markdown
Across Word, Google Docs, and Markdown editors, the first step is to initiate a bullet list using the editor’s button or a keyboard shortcut. Once the list is active, keep typing to populate items. Press Enter to add a new item, and press Tab to create a sub-bullet under the current item. Shift+Tab moves you back to the previous level. If you’re working in a Markdown editor, prefix each item with a dash or asterisk to form bullets, then let the editor render the list. In every case, the goal is to keep items parallel, concise, and easy to scan.
Indenting, nesting, and sub-bullets with keystrokes
Indenting creates sub-bullets to show hierarchical structure. The common pattern is Tab to indent and Shift+Tab to outdent. Some editors support Alt+Shift+Left/Right arrows to promote or demote bullet levels. Use these actions to build multi-level lists without breaking the flow of your writing. Consistency matters: decide on a maximum nesting depth and apply it uniformly across headings, features, or steps. When you nest, ensure each sub-item follows the same grammatical structure as its siblings for readability and scanning.
Converting bullets to numbered lists and back
Sometimes you need to switch a bulleted list to a numbered list or vice versa. Most editors offer a simple toggle in the List options or a keyboard-driven approach. Select the bullets, then choose the corresponding list type from the toolbar or menu. In some environments, removing formatting and reapplying the list type is faster than hunting for the exact command. The key is to preserve the content while changing its visual format so readers can follow the sequence or hierarchy clearly.
Customizing bullet styles and alignment
Bullet styles vary: dots, dashes, squares, and custom symbols. Editors typically allow you to switch bullet symbols and adjust indentation alignment for a cleaner appearance. When nesting, ensure the sub-bullets visually differentiate from parent items while maintaining alignment. If your document uses color or font changes to highlight bullets, apply those stylistic choices consistently across sections to avoid jarring shifts in tone. Always preview the final layout to confirm bullets render correctly on different devices.
Troubleshooting common issues
Bullets can misbehave when pasting from elsewhere, when mix-matching editors, or when styles conflict. If bullets disappear after paste, paste as plain text or reapply the bullet list formatting. If a list resets mid-document, check for stray line breaks or hidden formatting characters. When bullet levels shift unexpectedly, reapply Tab/Shift+Tab or Alt+Shift+Left/Right to restore the intended nesting. Finally, verify that your document uses a consistent default bullet style to prevent inconsistent appearance across sections.
Tools & Materials
- Keyboard(Full-size preferred; backlight helps in low-light drafting)
- Computer with Word/Google Docs/Markdown editor(Ensure edits can be saved online or offline)
- Mouse or trackpad(Useful for navigating menus during setup)
- Bullet list quick-reference cheat sheet(One-page guide for common actions)
- Document samples(Practice files to test shortcuts across editors)
Steps
Estimated time: 20-40 minutes
- 1
Identify your target editor
Open the document in the editor you will use (Word, Google Docs, or Markdown). Confirm that bullet lists are supported and locate the toolbar button for bullets. Understanding the environment reduces friction when you start typing.
Tip: If you’re unsure where the bullet command lives, hover over toolbar icons to reveal tooltips. - 2
Create the first bullet
Place the cursor where the list should begin and use the editor’s bullet command or a keyboard shortcut to start the list. Type the first item and press Enter to add the next bullet.
Tip: Keep your first item concise and parallel in structure to simplify subsequent items. - 3
Add items and maintain flow
Continue typing items, pressing Enter after each one. If you want a sub-item, press Tab to indent and create a nested bullet. Shift+Tab returns you to the previous level.
Tip: Aim for uniform sentence structure across all items for readability. - 4
Change list type when needed
If you switch to a numbered list, select the bullets and apply the numbered list option from the toolbar or menu. Re-selecting items ensures the change applies to the entire list.
Tip: Converting mid-list can help reorganize content without retyping. - 5
Customize bullets and nesting
Experiment with different bullet symbols and nesting depths. Ensure sub-bullets remain visually distinct from their parents and align with the document’s style.
Tip: Limit nesting to a practical depth to maintain readability. - 6
Review and finalize
Scan the list for parallelism, consistency in punctuation, and alignment. Save frequently to avoid loss of work during formatting tweaks.
Tip: Use a quick skim pass to catch inconsistent capitalization within bullets.
Questions & Answers
What is the fastest way to create a bullet list across editors?
The quickest approach is to use the editor’s built-in bullet tool and then press Enter for new items. Tabs to indent and Shift+Tab to outdent help you build structure without leaving the keyboard. Practicing in Word, Google Docs, and Markdown editors reinforces the rhythm.
Use the bullet tool, press Enter to add items, and Tab or Shift+Tab to structure your list.
How do I indent or outdent bullets quickly?
Indent with Tab to create sub-bullets and outdent with Shift+Tab. Some editors also offer Alt+Shift+Left or Right arrows for level changes. Consistency in nesting improves readability and document structure.
Press Tab to indent, Shift+Tab to outdent, and use editor-specific level-changing keys if available.
Can I convert bullets to numbered lists and back easily?
Yes. Select the list and apply the desired list type via the toolbar or a keyboard shortcut if your editor supports it. Conversion should preserve content; formatting may adjust to fit the new style.
Convert the list type in the toolbar or via a keyboard shortcut if your editor supports it.
Why are bullets misaligned after copy-paste?
Copy-paste can bring in mixed formatting. Use Paste as plain text, then reapply bullets, or clear formatting before reapplying the list to restore alignment.
If bullets misalign after paste, paste as plain text and reapply the list.
Are keyboard shortcuts different on Mac vs Windows?
Most editors follow similar logic, but modifier keys differ (Cmd on Mac vs Ctrl on Windows). When in doubt, use the editor’s help or a quick reference cheat sheet.
Yes, the main ideas are the same, but macOS uses Cmd instead of Ctrl.
Watch Video
Main Points
- Learn the core keystrokes for bullets across editors.
- Indent with Tab and outdent with Shift+Tab to create sub-bullets.
- Convert between bullets and numbers with the editor’s list options.
- Maintain consistency in style and nesting for readability.
- The Shortcuts Lib team recommends practicing across Word, Docs, and Markdown.